Editing has become much more than that – today’s content creators are seeking different dimensions in their videos that will make their messages interactive, add personality, and keep their viewers engaged. One of the most exciting features of CapCut Desktop itself is the AI avatar feature, which enables you to create characters that talk, walk, and work perfectly for your projects.
Instead of making the story just from live recordings or using images that represent your message, you could create a character who personifies the significance you want to promote, freed from constraints you might have in depicting this sensually.
This is a strong feature for authors looking to get noticed. Whether it’s explainer videos, short skits, game intros, or instructional videos, avatars make it personal without having to front the scene. And when combined with CapCut’s AI image generator, you have a complete content creation suite of tools that can be used to create dynamic, character-based content.
Why Use AI Avatars in Your Videos?
Avatars help videos to appear relatable, fun, and distinct. They can serve as brand representatives, storytellers, or animated avatars for creators who wish to keep a low profile. For marketers, AI avatars are a professional alternative for the delivery of messages, without having to engage actors. For the content creators, they enable them to try varying styles and tones.
CapCut Desktop makes this process trivial by providing you with a step-by-step path for creating, editing, and exporting avatar videos. You can see how you can get started here.
Getting Started with AI Avatars in CapCut
Now that you have an idea of how avatars can enrich your videos, let us run through the process. Below is the straightforward, five-stage guide from accessing the app to exporting your completed avatar-enabled video:
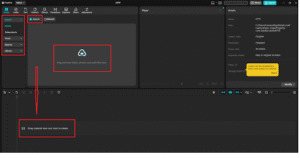
Step 1: Launch CapCut Desktop and Create a New Project
Open CapCut Desktop. On the Home screen, select New Project. Select a video/audio file or an image from your computer that you want to pinch as the original material and click on Open.
Your chosen asset(s) will open in the Media panel, and the preview window & timeline will display in the workspace. This provides the scene for developing your avatar for the project.

Step 2: Open the AI Avatar Tool
From the left-hand navigation bar, choose AI Avatar. This will pop open a new panel with various avatar templates for you to scroll through.
Professional, casual, animated, fun, any number of avatar styles fit your project. Optional: If selected, click Generate to add it to your project. Your avatar will show up in your Media panel – now it is ready to be added to the timeline.
![]()
Step 3: Add Voice and Sync to Avatar
To have your avatar talk, on the Audio tab, click Add audio to upload a voice recording. Or you can do so with CapCut’s Text-to-Speech feature by typing up your script and picking a voice style.
When your audio is ready, drag it into the video timeline below your video. Super important: select the avatar in the timeline and under settings, connect it with the audio track. CapCut will automatically sync the avatars’ lip movements with the selected voice, so that it looks realistic.
Step 4: Customize the Avatar with AI Image Generator and Effects
If you want your avatar to look even more unique, you can use other creative elements with it. Navigate to the AI tools tab > select the option for AI image generator, to make one’s own backgrounds/props for the scene. If you want to generate your own, use the description box, click Generate, and include the image that appears in your Media panel.
Drag this prop or background into your avatar in the timeline as a part of the environment. Finally, you can use the filters, effects, and stickers available on the left sidebar to make the video look professional.
![]()
Step 5: Export Your Avatar Video
When you are happy with the design and sound, click the Export button in the upper right of the window. A Configure window will pop up, which allows you to add a title, file destination, and/or change the video quality.
Then your final video will be rendered by CapCut, so just click Export again. You’ll now have a professional-grade clip featuring you as an AI avatar that you can share across social media or other platforms.
![]()
Final Thoughts
AI avatars create new, thrilling creative opportunities for video makers. They make it easy to bring characters to life, tell stories in new ways, and engage with audiences on a deeper level – without any complex animation skills.
With CapCut Desktop, all is integrated into one place. The AI image generator allows users to create their own custom-branded character designs, to link the languages and voices to match the background, and to even pre-create multiple backgrounds before exporting their finished video.
With this combination of AI-powered features, CapCut becomes one of the most versatile and user-friendly tools available today for creators looking to stand out.


