
Introduction to Pauldron
Are you ready to embark on a creative adventure? Crafting your own pauldron can be an exciting journey into the world of armor-making. Whether you’re interested in historical reenactments, cosplay, or simply enjoy crafting as a hobby, making a pauldron allows you to express your individuality and creativity. This iconic piece of armor not only offers protection but also serves as a stunning visual statement. With the right tools and guidance, beginners can dive into this rewarding project with confidence.
In this step-by-step guide, we’ll walk you through everything from selecting materials to assembling your very own custom-designed pauldron. Grab your gear and let’s unleash our inner armorer!
Tools and Materials Needed
Creating a pauldron requires specific tools and materials to ensure a successful project. Start with metal sheets, typically steel or aluminum, which provide durability and protection.
You’ll also need cutting tools like tin snips or a plasma cutter for precise shapes. These will help in achieving clean edges on your metal pieces.
Next, invest in hammers and anvils for shaping the metal. A variety of mallets can be useful to avoid damaging surfaces while you form the curves of your design.
Safety gear is essential too; gloves, goggles, and an apron protect against sharp edges and flying debris during the crafting process.
For assembly, consider rivets or screws along with appropriate fastening tools. Adhesives may come in handy if you’re adding decorative elements later on.
Gathering all these items beforehand will streamline your crafting experience!
Step 1: Choosing the Design and Size
Choosing the right design and size for your pauldron is crucial. It sets the stage for both functionality and aesthetic appeal.
Start by exploring various styles, from classic medieval to more modern interpretations. Look at historical references or even fantasy designs that inspire you. This will help narrow down your options.
Next, consider the purpose of your pauldron. Will it be used for reenactments, costume parties, or simply as a display piece? The intended use can influence its dimensions and features.
Measure yourself accurately to ensure a proper fit. A well-fitted pauldron enhances comfort during wear while looking visually appealing.
Sketching out ideas can also help solidify your vision before moving forward into crafting stages. Don’t rush this step; take time to find a design that resonates with you personally.
Step 2: Preparing the Materials
After selecting your design, it’s time to gather the materials needed for your pauldron. Start with metal sheets, which will form the backbone of your armor. Common choices include aluminum or mild steel due to their workability and strength.
Next, you’ll need various tools at hand. A cutting tool is essential—this could be a metal saw or even tin snips for thinner sheets. Don’t forget protective gear like gloves and goggles; safety should always come first when working with sharp edges.
Additionally, prepare items such as a hammer, pliers, and sandpaper for smoothing out any rough spots later on. You may also want some cardboard to create templates before committing to cuts in the metal.
Taking these steps ensures that you have everything organized and ready before moving forward with crafting your unique piece of armor.
Step 3: Cutting the Metal Pieces
Cutting the metal pieces is where your design starts to take shape. Precision is key at this stage, so take your time.
Using a metal shears or a band saw, carefully follow the outlines marked on your material. If you’re new to cutting metal, practice with scrap pieces first. This will build your confidence and ensure cleaner cuts.
Always wear protective gear like gloves and goggles during this process; safety should be a priority. The sharp edges can be unforgiving if mishandled.
Once you’ve cut out all necessary components, inspect each piece for any rough edges or burrs. A smooth finish will make assembly easier later on.
After trimming them down, set aside the pieces in an organized manner. Keeping everything sorted helps streamline the next steps of crafting your pauldron.
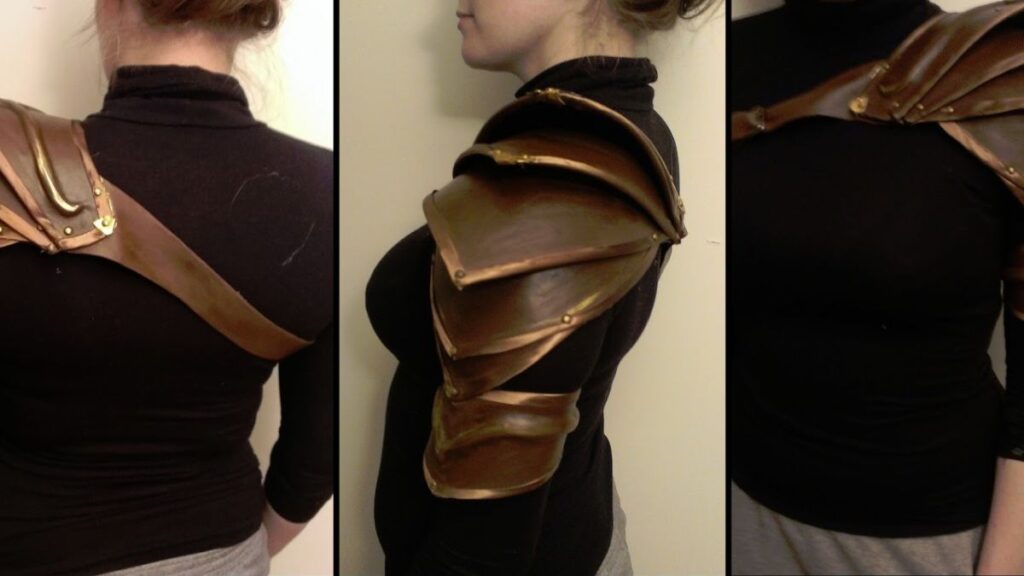
Step 4: Shaping and Forming the Pauldron
Shaping your pauldron is where the magic begins. This step brings your design to life, allowing you to mold metal into a protective piece of art.
Start by heating the metal. A forge or propane torch works well for this purpose. Ensure even heating; it makes forming easier and more effective.
Once heated, use a hammer and anvil or a mallet and form block for shaping. The goal is to create gentle curves that fit comfortably over your shoulder.
Take breaks if needed, as working with hot metal can be taxing on both body and mind.
If you’re aiming for intricate designs, consider using dapping tools for added precision in detailing contours. Each strike of the hammer should feel intentional; this is where craftsmanship shines through.
Don’t rush—this phase defines not just aesthetics but functionality too!
Step 5: Adding Decorative Elements
Adding decorative elements to your pauldron can elevate its aesthetic appeal. This step is where creativity takes center stage.
Consider using engravings or etchings for intricate designs. Patterns inspired by nature or medieval motifs work beautifully. A steady hand and some practice with engraving tools will help you achieve stunning results.
Another option is to incorporate paint or metal finishes. Choose colors that complement the overall look of your armor. Metallic paints can mimic the appearance of aged bronze or silver, enhancing authenticity.
Don’t forget about embellishments like rivets, gemstones, or leather straps. These small details catch the eye and reflect personal style.
Remember, balance is key when adding decorations. Too many elements may overwhelm the design, while too few might make it appear plain.
Take your time during this phase; it’s a chance to showcase your personality through craftsmanship.
Step 6: Assembling the Pauldron
With all the parts ready, it’s time to bring your pauldron to life. Start by laying out each piece in front of you. This will give you a clear view of how everything fits together.
Begin with the larger sections, aligning them carefully. Use clamps or weights to hold everything in place while you work on securing them.
Next, take your rivets or screws and attach each component securely. It’s important to ensure that every connection is tight; this enhances durability and maintains structural integrity.
Once attached, check for any rough edges or sharp points that might be uncomfortable when worn. A little sanding can go a long way here.
Try on the pauldron as you assemble it step by step. Adjustments may be necessary for comfort and fit before finishing touches are added later.
Optional Steps for a More Detailed Pauldron
If you’re looking to elevate your pauldron crafting game, there are several optional steps you can take for a more detailed and personalized piece.
Consider adding custom engravings or etchings to the metal surface. This adds a unique flair that showcases your personal style and craftsmanship. You can use specialized tools designed for engraving to achieve precise designs.
Another way to enhance your pauldron is through patina treatments. Applying chemicals can create beautiful color variations on the metal, making it look aged or giving it an entirely new hue. Just remember to follow safety measures when handling these substances.
For those who want extra protection and durability, applying a clear coat finish will not only protect against scratches but also add a polished shine that’s visually appealing.
Think about incorporating leather straps or padding for comfort during wear. These elements not only improve functionality but also complete the aesthetic charm of your handcrafted pauldron.
With these additional touches, you’ll create a stunning piece that stands out in any collection or reenactment event. Happy crafting!